Building user empathy: The Windmill guide to design thinking
You might hear designers talk a lot about empathy—specifically, empathy with the customer. That doesn’t mean they’re desperately concerned about the customer’s personal worries and feelings, for instance why their child is struggling in school or why they like a particular soccer team so much. That type of empathy is called compassionate or emotional empathy.
The type of empathy a designer expresses in their work is a third type: cognitive empathy. Cognitive empathy is defined by Daniel Goleman, renowned psychologist and author of the 1995 book Emotional Intelligence, as:
Simply knowing how the other person feels and what they might be thinking. Sometimes called perspective-taking.
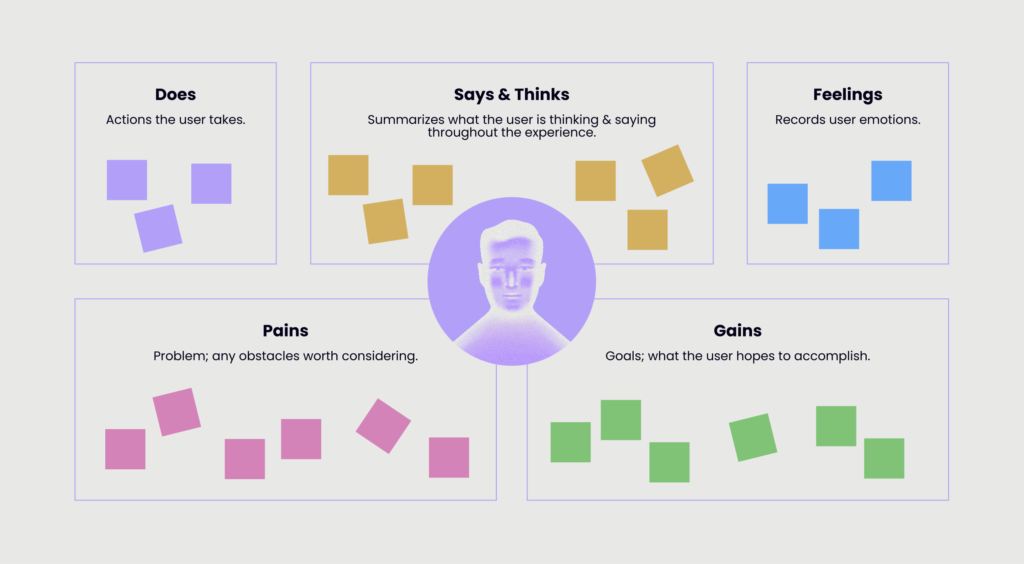
For a start-up, or a team launching a new product within a company, the stakes are high. Getting a picture of your customer that’s useful for business purposes is vital, and requires structured thinking. To achieve that, designers often use a tool called an Empathy Map.
An empathy map is a collaboration tool for visualizing ideas that teams can use to understand their customers better. It allows a team to evaluate the problem that its product solves for the user and can be used whenever a design team needs to immerse themselves in the user’s environment. Use-cases include:
- When a team is developing a persona for its client;
- When a team needs to understand its clients better for in-depth interviews.
- When describing a user persona in a user story.
An empathy map can be used in conjunction with a customer journey map, which maps out the customer’s journey through the product.

To maximize the value of an empathy map, there are several factors you need to consider. Keep in mind that your empathy map needs to be concise, yet informative. Below we elaborate on this further.
Empathy Map: a step-by-step guide
To create an empathy map, you will need a user persona, research data, and your team.
Step 1: Define Goals.
Take the user persona you created for your empathy map and place it in the center. Next, set your main goals. Consider the end result you wish to see, or any relevant questions that interest you most.
Step 2: Set up the empathy map
Fill in the map step-by-step according to the quadrants.
- Does.
This section describes the actions taken by the user while using the product. To complete this section, think about: How do they use it? How do they solve the problem? How do they search for information on it? - Says & Thinks.
This quadrant summarizes what the user says and thinks throughout their experience. What do they care about? What are their likes and dislikes? What challenges do they face? If you’ve done interviews, you can record direct quotes here too. They could be something like, “I like this product because it helps me spend less time searching for the right option.” - Feelings.
This section is for noting down the user’s feelings. These can be gathered directly by asking (but there is always a risk of disingenuous answers) or by inferring body language. For instance, a sigh can indicate an expression of tedium; or circling the screen with a mouse can indicate frustration. If you are working on a live product, you might be able to find reviews online where users volunteer their feelings.
Next, fill in the user’s problems and goals.
- Pains (problems) include difficulties the user has, such as being afraid to make a mistake, high prices, etc.
- Gains (goals) include what users are striving for and hoping to achieve. For example, success at work, establishing a schedule, travel, etc.
Step 3: Find duplicates and define uncertainties
Once all the quadrants are filled, review similar entries and group or place them next to each other. If you are unsure of your decision or some answers coincide in several quadrants, place them in the quadrant for which they are most suited.
Step 4: Discuss and consolidate
With all quadrants filled, break for ten-minutes then discuss with your team if there are any changes to make. Share your thoughts among the group and discuss how the knowledge gained today will affect the project. Lastly, evaluate progress towards the goals laid out in Step 1.
Conclusion
A ready-to-use Empathy Map is a starting point for analyzing users’ needs, product aesthetics, or solving product challenges. Our step-by-step guide will give you a better understanding of your customers’ needs.
It is important that the map is accessible and that the information behind it is not outdated by periodically revisiting and refreshing the empathy map. This will make it into an effective tool that helps you better understand your customers’ needs.
We’ve tried to make it as easy as possible for your team to benefit from the user interview template. But nothing beats the guidance thatan experienced design teamcan offer, soget in touchtoday to find out how Windmill can help your business clarify its user interviews, business model, and other key strategic pillars.


